만들어 놓은 모델을 Serving하는 방법은 여러 가지가 있고, 간단하게는 아래와 같이 Flask를 이용하는 방법이 있다.
[GCP] Flask로 TF 2.0 MNIST 모델 서빙하기
우선 TensorFlow 2.0을 설치하자. 머신에 직접 설치하거나 도커를 다운받아 사용, 혹은 구글 colab을 활용( https://www.tensorflow.org/install)하면 되는데, TensorFlow에서 권장하는대로 머신에 VirtualEnv를..
magoker.tistory.com
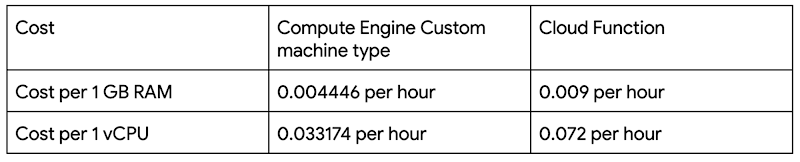
이러한 방법의 단점으로는 특정 서버에 Package를 깔아 사용해야 한다는 귀찮음인데, GCP에서는 Cloud Functions를 통해 Serverless로 테스트할 수 있는 방법을 제공한다. 게다가 이 방법은 가격까지 이득을 가져올 수 있다.
GCP AI Platform Notebook에서 Fashion MNIST 모델을 만들어, Google Cloud Storage로 옮긴 후 Cloud Functions에서 HTTP로 호출하는 구조로 아래의 GCP블로그를 참조(아니고 베끼기) 하였다.
How to serve deep learning models using TensorFlow 2.0 with Cloud Functions | Google Cloud Blog
Learn how to run inference on Cloud Functions using TensorFlow 2.0.
cloud.google.com
Fashion MNIST 모델을 만드는 코드는 아래와 같은데 각자 해석.
from __future__ import absolute_import
from __future__ import division
from __future__ import print_function
from __future__ import unicode_literals

import tensorflow as tf

from tensorflow.keras.layers import Dense, Flatten, Conv2D
from tensorflow.keras import Model
EPOCHS = 10

mnist = tf.keras.datasets.mnist
fashion_mnist = tf.keras.datasets.fashion_mnist

(x_train, y_train), (x_test, y_test) = fashion_mnist.load_data()
x_train, x_test = x_train / 255.0, x_test / 255.0

# Add a channels dimension e.g. (60000, 28, 28) => (60000, 28, 28, 1)
x_train = x_train[..., tf.newaxis]
x_test = x_test[..., tf.newaxis]

train_ds = tf.data.Dataset.from_tensor_slices(
    (x_train, y_train)).shuffle(10000).batch(32)
test_ds = tf.data.Dataset.from_tensor_slices((x_test, y_test)).batch(32)

class CustomModel(Model):
  def __init__(self):
    super(CustomModel, self).__init__()
    self.conv1 = Conv2D(32, 3, activation='relu')
    self.flatten = Flatten()
    self.d1 = Dense(128, activation='relu')
    self.d2 = Dense(10, activation='softmax')

  def call(self, x):
    x = self.conv1(x)
    x = self.flatten(x)
    x = self.d1(x)
    return self.d2(x)

model = CustomModel()

loss_object = tf.keras.losses.SparseCategoricalCrossentropy()
optimizer = tf.keras.optimizers.Adam()

train_loss = tf.keras.metrics.Mean(name='train_loss')
train_accuracy = tf.keras.metrics.SparseCategoricalAccuracy(name='train_accuracy')

test_loss = tf.keras.metrics.Mean(name='test_loss')
test_accuracy = tf.keras.metrics.SparseCategoricalAccuracy(name='test_accuracy')

@tf.function
def train_step(images, labels):
  with tf.GradientTape() as tape:
    predictions = model(images)
    loss = loss_object(labels, predictions)
  gradients = tape.gradient(loss, model.trainable_variables)
  optimizer.apply_gradients(zip(gradients, model.trainable_variables))

  train_loss(loss)
  train_accuracy(labels, predictions)

@tf.function
def test_step(images, labels):
  predictions = model(images)
  t_loss = loss_object(labels, predictions)

  test_loss(t_loss)
  test_accuracy(labels, predictions)

for epoch in range(EPOCHS):
  for images, labels in train_ds:
    train_step(images, labels)

  for test_images, test_labels in test_ds:
    test_step(test_images, test_labels)

  template = 'Epoch {}, Loss: {}, Accuracy: {}, Test Loss: {}, Test Accuracy: {}'
  print (template.format(epoch+1,
                         train_loss.result(),
                         train_accuracy.result()*100,
                         test_loss.result(),
                         test_accuracy.result()*100))

# Save the weights
model.save_weights('fashion_mnist_weights')
생성된 모델을 GCS로 Copy 한다.
gsutil cp * gs://gcs_ai_notebook_****/tensorflow/
gsutil ls gs://gcs_ai_notebook_****/tensorflow/
------
gs://gcs_ai_notebook_****/tensorflow/checkpoint
gs://gcs_ai_notebook_****/tensorflow/fashion_mnist_weights.data-00000-of-00001
gs://gcs_ai_notebook_****/tensorflow/fashion_mnist_weights.index
gs://gcs_ai_notebook_****/tensorflow/saved_model.pb
테스트를 위해 아래 이미지도 같은 디렉토리에 하나 넣어 두자.

이제 Cloud Functions에서 호출 코드를 넣어주면 되는데 설정은 아래와 같이 하였다. Cloud Functions에서는 패키지를 모두 설치할 필요는 없고 수행에 필요한 패키지들을 requirements.txt에 명시해 주고, main.py에서 호출 코드를 작성해 준다. 아래는 HTTP로 요청이 오면 handler 함수를 실행하라는 뜻이다.
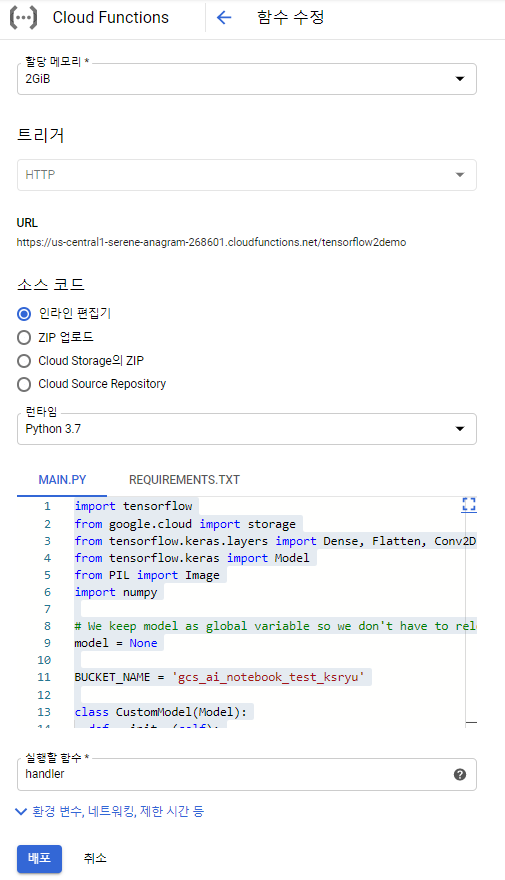
<requirements.txt>
  # Function dependencies, for example:
# package>=version

tensorflow==2.0.0b0
google-cloud-storage==1.16.1
Pillow==6.0.0
<main.py>
import tensorflow
from google.cloud import storage
from tensorflow.keras.layers import Dense, Flatten, Conv2D
from tensorflow.keras import Model
from PIL import Image
import numpy

# We keep model as global variable so we don't have to reload it in case of warm invocations
model = None

BUCKET_NAME = 'gcs_ai_notebook_****'

class CustomModel(Model):
  def __init__(self):
    super(CustomModel, self).__init__()
    self.conv1 = Conv2D(32, 3, activation='relu')
    self.flatten = Flatten()
    self.d1 = Dense(128, activation='relu')
    self.d2 = Dense(10, activation='softmax')

  def call(self, x):
    x = self.conv1(x)
    x = self.flatten(x)
    x = self.d1(x)
    return self.d2(x)


def download_blob(bucket_name, source_blob_name, destination_file_name):
  """Downloads a blob from the bucket."""
  storage_client = storage.Client()
  bucket = storage_client.get_bucket(bucket_name)
  blob = bucket.blob(source_blob_name)

  blob.download_to_filename(destination_file_name)

  print('Blob {} downloaded to {}.'.format(source_blob_name, destination_file_name))


def handler(request):
  global model
  class_names = [
    'T-shirt/top', 'Trouser', 'Pullover', 'Dress', 'Coat', 'Sandal', 'Shirt', 'Sneaker', 'Bag',
    'Ankle boot'
  ]

  # Model load which only happens during cold starts
  if model is None:
    download_blob(BUCKET_NAME, 'tensorflow/fashion_mnist_weights.index',
                  '/tmp/fashion_mnist_weights.index')
    download_blob(BUCKET_NAME, 'tensorflow/fashion_mnist_weights.data-00000-of-00001',
                  '/tmp/fashion_mnist_weights.data-00000-of-00001')
    model = CustomModel()
    model.load_weights('/tmp/fashion_mnist_weights')

  download_blob(BUCKET_NAME, 'tensorflow/test.png', '/tmp/test.png')
  image = Image.open('/tmp/test.png')
  input_np = (numpy.array(image).astype('float32') / 255)[numpy.newaxis, :, :, numpy.newaxis]
  predictions = model.call(input_np)
  print(predictions)
  print('Image is ' + class_names[numpy.argmax(predictions)])

  return class_names[numpy.argmax(predictions)]
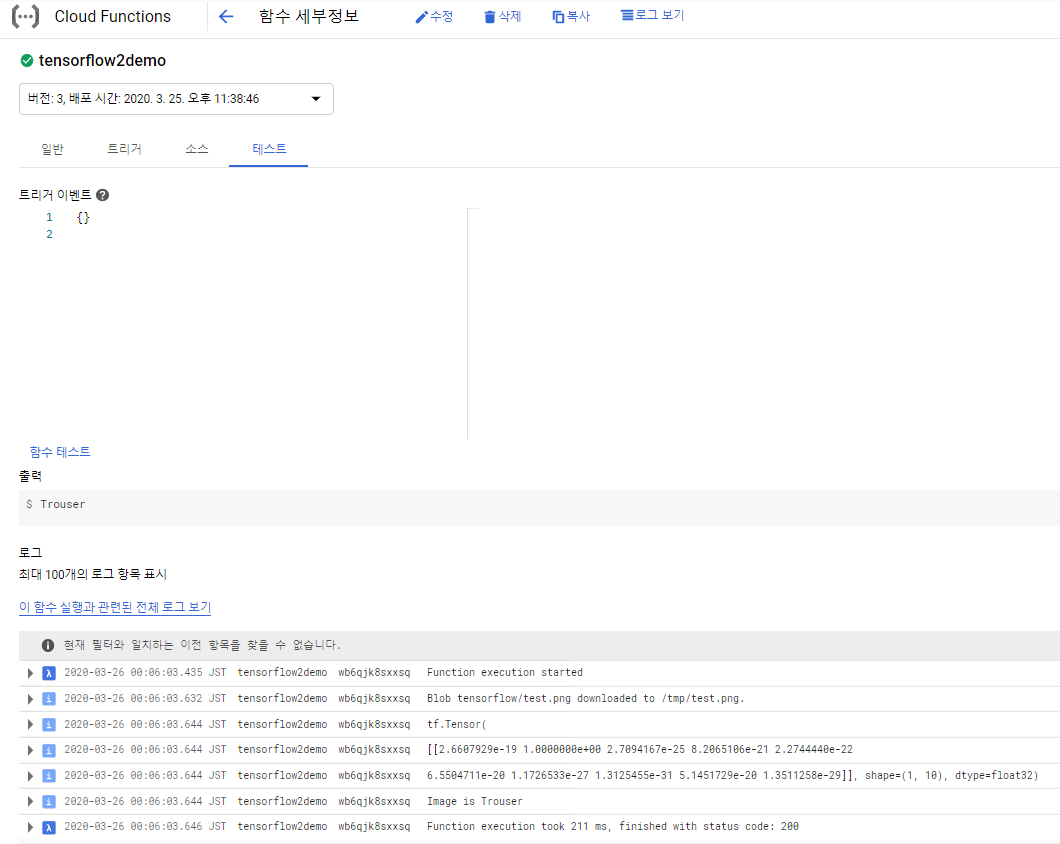
모두 설정을 하고 하단의 배포 버튼을 누르면 배포가 시작된다. 배포가 끝나면 Cloud Functions의 Test 메뉴가 활성화 되고, 함수 테스트를 실행한 후 결과를 얻을 수 있다.
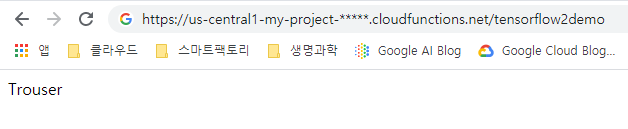
물론 http를 통해 서빙하는 것이므로 웹상에서 주소를 입력해도 동일한 결과를 얻을 수 있다.
테스트 코드 작성을 조금 번거롭게 했지만, 서버 설정 없이 간단히 테스트를 완료할 수 있었다.
'AI 빅데이터 > Google Cloud Platform' 카테고리의 다른 글
| [GCP] 리전 제한 설정하기 (0) | 2020.04.09 |
|---|---|
| [GCP] AI Platform으로 Hyper Parameter Tuning 하기 (1) | 2020.03.28 |
| [GCP] BigQuery로 외부에서 조직의 결제 정보 받아오기 (0) | 2020.03.04 |
| [GCP] Cloud IAM과 Cloud ID로 사용자 계정 권한 주기 (0) | 2020.03.04 |
| [GCP] 청구된 비용 환불 요청하기 (11) | 2020.03.04 |


댓글