AI 학습을 하다보면 Learning Rate와 같이 하이퍼 파라미터 값을 설정하는 것에 따라 성능의 차이가 발생한다. 전통적 방법으로는 여러 파라미터를 대입해가며 점차 가장 효율적인 값을 찾아가게 되는데 아무래도 시간이 많이 소요되고 결과에 대한 확신도 부족하게 된다. 그래서, 생긴 기법이 HPO(Hyper Parameter Optimization)인데 GCP에서는 AI Platform 상에 컨테이너를 올려 최적의 파라미터를 찾게 된다.
1) 모델 내 Hyper Parameter 설정 모듈 작성 2) 모델의 Dockerize 3) Docker Image Build 및 Upload 4) AI플랫폼에서 등록된 모델의 위치와 Hyper Parameter 범위를 설정하여 실행하는 순서로 진행하면 된다.
1) 모델 내 Hyper Parmater 설정 모듈 작성
.....

def test(args, model, device, test_loader, epoch):
  model.eval()
  test_loss = 0
  correct = 0
  with torch.no_grad():
    for data, target in test_loader:
      data, target = data.to(device), target.to(device)
      output = model(data)
      test_loss += F.nll_loss(
          output, target, size_average=False).item()  # sum up batch loss
      pred = output.max(
          1, keepdim=True)[1]  # get the index of the max log-probability
      correct += pred.eq(target.view_as(pred)).sum().item()

  test_loss /= len(test_loader.dataset)
  print('\nTest set: Average loss: {:.4f}, Accuracy: {}/{} ({:.0f}%)\n'.format(
      test_loss, correct, len(test_loader.dataset),
      100. * correct / len(test_loader.dataset)))

  # Uses hypertune to report metrics for hyperparameter tuning.
  hpt = hypertune.HyperTune()
  hpt.report_hyperparameter_tuning_metric(
      hyperparameter_metric_tag='my_loss',
      metric_value=test_loss,
      global_step=epoch)

....
MNIST 학습하는 모듈로, test 함수 내에 Hyper Tune Metric 부분이 파라미터 최적화를 설정하는 부분이고, 'my_loss'가 target 값이 된다.
2) 모델의 Dockerize
Trainer를 만들었으니, Trainer를 여러 머신이 병렬처리 할 수 있도록 Dockerize해야 한다. Docker가 설치되어 있지 않다면 아래를 참조하면 된다.
우분투 18.04 도커(Docker) 설치 방법 - 코스모스팜 블로그
도커(Docker)는 응용 프로그램들을 소프트웨어 컨테이너 안에 배치시키는 일을 자동화하는 오픈 소스 프로젝트입니다. 우분투(Ubuntu) 18.04 버전에서 도커(Docker) 설치 방법을 핵심만 정리했으니 바로 따라 해 보세요.
blog.cosmosfarm.com
주의해야 할 부분은 GCP 서비스를 Console 이외에서 실행할 수 있게 해 주는 GCP SDK를 설치해 주어야하는데 중간 부분을 참조하면 된다.
# Dockerfile
FROM python:2.7.15-jessie
WORKDIR /root

# Installs pytorch and torchvision.
RUN pip install torch==1.0.0 torchvision==0.2.1

# Installs cloudml-hypertune for hyperparameter tuning.
# It’s not needed if you don’t want to do hyperparameter tuning.
RUN pip install cloudml-hypertune

# Installs google cloud sdk, this is mostly for using gsutil to export model.
RUN wget -nv \
    https://dl.google.com/dl/cloudsdk/release/google-cloud-sdk.tar.gz && \
    mkdir /root/tools && \
    tar xvzf google-cloud-sdk.tar.gz -C /root/tools && \
    rm google-cloud-sdk.tar.gz && \
    /root/tools/google-cloud-sdk/install.sh --usage-reporting=false \
        --path-update=false --bash-completion=false \
        --disable-installation-options && \
    rm -rf /root/.config/* && \
    ln -s /root/.config /config && \
    # Remove the backup directory that gcloud creates
    rm -rf /root/tools/google-cloud-sdk/.install/.backup

# Path configuration
ENV PATH $PATH:/root/tools/google-cloud-sdk/bin
# Make sure gsutil will use the default service account
RUN echo '[GoogleCompute]\nservice_account = default' > /etc/boto.cfg

# Copies the trainer code
RUN mkdir /root/trainer
COPY trainer/mnist.py /root/trainer/mnist.py

# Sets up the entry point to invoke the trainer.
ENTRYPOINT ["python", "trainer/mnist.py"]
위 과정까지의 전체 코드는 아래를 통해 가져올 수 있다.
wget https://github.com/GoogleCloudPlatform/cloudml-samples/archive/master.zip
unzip master.zip
cd cloudml-samples-master/pytorch/containers/quickstart/mnist
3) Docker Image Build 및 Upload
Docker Image 이름을 겹치지 않게 Build 해 준다.
export PROJECT_ID=$(gcloud config list project --format "value(core.project)")
export IMAGE_REPO_NAME=mnist_pytorch_custom_container
export IMAGE_TAG=mnist_pytorch_cpu
export IMAGE_URI=gcr.io/$PROJECT_ID/$IMAGE_REPO_NAME:$IMAGE_TAG

docker build -f Dockerfile -t $IMAGE_URI ./
이미지를 GCP Container Registry로 밀어 넣으면 준비가 끝난다. 커맨드라인에서 GCP 서비스를 이용하는 것이므로 gcloud auth login을 통해 권한 획듯하는 것을 잊지 않아야 한다.
gcloud auth login
docker push $IMAGE_URI
4) AI 플랫폼에서 병렬처리 수행
커맨드라인으로 AI Platform에 명령을 내릴 수도 있지만, 쉽게 하는 것이 목적이므로 GCP Console 내에서 Job을 Submit 해 보자.

작업 메뉴에서 커스텀 코드 학습 > 컨테이너 이미지 학습을 선택해 주고, GCR에 올려 놓은 이미지와 작업 디렉토리로 활용할 GCS의 위치를 지정해 준다.

모델이 수행될 위치와 하이퍼파라미터(lr, momentum)의 범위를 적고, 나머지 변수들을 세팅해 준다.
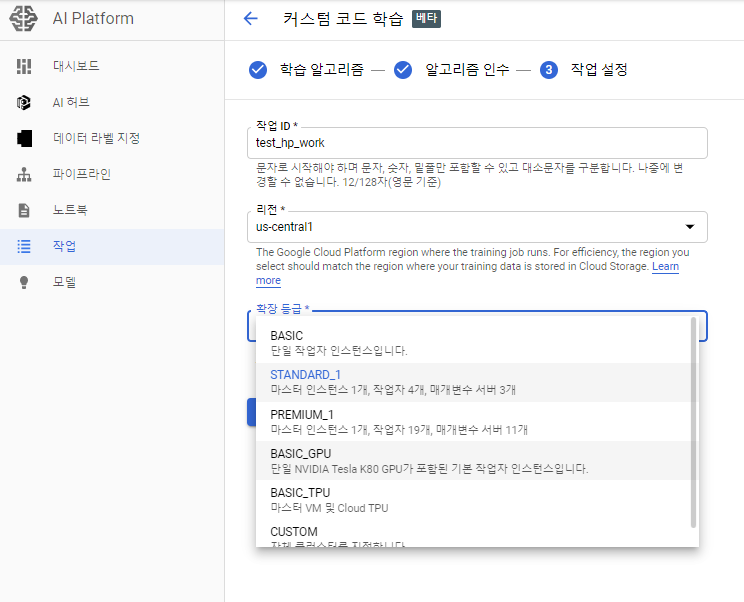
마지막으로 서버를 몇 개로 돌릴 것인가를 선택해야 하는데, GCP 무료 크레디트로는 STANDARD_1까지 선택 가능하지만 일단 BASIC으로 시작하자
설정을 완료하고 Training이 끝나면 아래와 같은 결과를 확인할 수 있다.

3번째 시도에 있었던 lr=0.04101, momentum=0.43965 일대 loss가 가장 적게 되었음을 확인할 수 있다.
'AI 빅데이터 > Google Cloud Platform' 카테고리의 다른 글
| [GCP] What-If Tool Analysis 사용하기 (0) | 2020.04.09 |
|---|---|
| [GCP] 리전 제한 설정하기 (0) | 2020.04.09 |
| [GCP] TF 2.0 모델 Cloud Functions로 서빙하기 (2) | 2020.03.26 |
| [GCP] BigQuery로 외부에서 조직의 결제 정보 받아오기 (0) | 2020.03.04 |
| [GCP] Cloud IAM과 Cloud ID로 사용자 계정 권한 주기 (0) | 2020.03.04 |


댓글