Kubeflow의 공식정의는 아래와 같다.
"The Kubeflow project is dedicated to making deployments of machine learning (ML) workflows on Kubernetes simple, portable and scalable. Our goal is not to recreate other services, but to provide a straightforward way to deploy best-of-breed open-source systems for ML to diverse infrastructures. Anywhere you are running Kubernetes, you should be able to run Kubeflow"
Kubernetes 상에서 ML Workflow를 이식성과 확장성 있게 배포한다는 의미인데, 그저 컨테이너로 ML컴퍼넌트를 구성하여 컴퍼넌트 간의 파이프라인을 만들어 직렬로 실행할 수 있게 해 준다 정도로 개인적으로는 이해하고 있다. 이런 도구로는 Airflow나 이를 GCP상에서 구현한 Cloud Dataflow도 있는데, 차이점은 각 단계의 모듈이 컨테이너로 구성되었냐 아니냐의 차이 정도랄까. 하지만, 그 차이가 처음에 얘기한 이식성과 확장성을 만들어 준다.
설치와 테스트는 이수진님의 아래 포스팅을 그대로 따라했다. 이전부터 관심은 있었지만 Step-by-Step으로 따라할만한 예제를 찾기 힘들었는데, 너무 쉽게 잘 정리해주셔서 이해가 용이했다.
kubeflow 설치하기 - Machine Learning pipeline kubeflow install
포스팅 개요 이번 포스팅은 지난 글인 머신러닝 파이프라인이란?(Machine Learning pipeline) 글에 이어서 머신러닝 파이프라인인 kubeflow를 설치(kubeflow install)하는 방법에 대해서 작성합니다. 지난 글 ��
lsjsj92.tistory.com
설치를 간단히 재정리하면, 아래의 순서와 같다.
1. MiniKube Install
$ brew install minikube
2. Minikube 실행
Mac용 Docker를 실행한 뒤, 아래의 명령으로 Minikube Start
$ minikube start --cpus 4 --memory 8096 --disk-size=60g
3. kfctl (Kubeflow Control) 설치
$ wget https://github.com/kubeflow/kfctl/releases/download/v1.0.2/kfctl_v1.0.2-0-ga476281_darwin.tar.gz
// 아래에서 가장 최근의 Release를 가져오면 됨
kubeflow/kfctl
kfctl is a CLI for deploying and managing Kubeflow - kubeflow/kfctl
github.com
$ tar -xvf kfctl_v1.0.2-0-ga476281_darwin.tar.gz
// .kfctl 생성
4. 환경변수 설정
export PATH=$PATH:$(PWD)
export KF_NAME=ksryu-kubeflow
export BASE_DIR=/Users/xxxxx/kubeflow
export KF_DIR=${BASE_DIR}/${KF_NAME}
export CONFIG_FILE=${KF_DIR}/kfctl_k8s_istio.v1.0.2.yaml
export CONFIG_URI="https://raw.githubusercontent.com/kubeflow/manifests/v1.0-branch/kfdef/kfctl_k8s_istio.v1.0.2.yaml"
마지막 CONFIG_URI는 아래 링크의 CONFIG_FILE과 URI 부분을 보고 최신의 것으로 Update함
Kubeflow Deployment with kfctl_k8s_istio
Instructions for installing Kubeflow on your existing Kubernetes cluster using kfctl_k8s_istio config
www.kubeflow.org
5. Kubeflow Build & Install
$ mkdir -p ${KF_DIR}
$ cd ${KF_DIR}
$ kfctl build -V -f ${CONFIG_URI}
$ kfctl apply -V -f ${CONFIG_FILE}
6. 설치테스트
중간에 뭐라고 Warning이 나오지만, 설치가 될 것임.
아래 명령을 해 보면 pod들이 생성되는 것이 보이는 데, 아래와 같이 모두 Running될때까지 기다린다. (15분 안팎)
$ kubectl -n kubeflow get pod

7. 쿠버네티스 네트워크 설정
위의 과정까지는 한번만 하면 된다. 즉, minikube를 켜 두면 자원을 계속 잡아 먹으니, 테스트가 끝나면 'minikube stop'을 하고 다시 사용시 'minikube start'를 해 준다. 단, 아래의 네트워크 설정은 minikube를 start 할 때마다 실행해 주어야 한다. 설명은 복잡하지만, Kubeflow는 Micro Service Architecture를 채택하고 있고, Service Mesh는 Istio를 통해 접근된다고만 기억해 두자. (나도 그렇게만.. ㅠ)
$ export NAMESPACE=istio-system
$ kubectl port-forward -n istio-system svc/istio-ingressgateway 8080:80
8. 접속 테스트
https://localhost:8080으로 접근하면 Kubeflow Dashboard를 볼 수 있다.

설치가 완료되었으니, 이수진 님이 작성한 Iris 분류 예제를 간단히 따라해 보자. 사실 위까지 단계는 GCP를 사용하면 따로 구성할 필요가 없다. AI Platform Pipeline이라는 이름으로 Kubeflow를 지원하기 시작했다.
kubeflow pipeline 사용해보기 - kubeflow pipeline example with iris data
포스팅 개요 이번 포스팅은 kubeflow 예제(kubeflow example)에 대해서 작성합니다. 지난 포스팅에서 kubeflow 설치하는 방법에 대해서 알아보았는데요. kubeflow 설치 후 kubeflow pipeline을 이용해서 kubeflow..
lsjsj92.tistory.com
1. 코드 가져오기 (Clone)
이수진 님이 작성한 코드를 가져와 보자
git clone https://github.com/lsjsj92/kubeflow_example
2. 컨테이너 작성 및 등록
data load와 model training으로 나뉘어 있는데, kubeflow는 단계별로 컨텐이너를 실행하는 것이므로 각각을 container로 만들어 주면 된다.
// 1_data_load로 들어가서
$ docker build -t xxxx/iris-preprocessing:0.6 .
$ docker push xxxx/iris-preprocessing:0.6

// 2_model_training으로 들어가서
$ docker build -t xxxx/iris-training:0.6 .
$ docker push xxxx/iris-training:0.6
단, 이수진님의 코드를 kubeflow에서 실행시키면 pandas module이 없다는 에러가 나기도 하는데, requirements.txt에 아래를 추가한다.
pandas==1.0.4그리고 Iris.csv의 대문자 I를 소문자로 바꿔주자. (Iris.csv -> iris.csv)
3. DSL 파일 작성하기
이수진님 소스에서 처럼 DSL을 작성해서 컴파일 해 둔다. DSL은 Domain Specific Language라고 하는데, 왜 그 이름인지는..
from kfp import dsl
@dsl.pipeline(
    name='iris',
    description='iris test'
)

def soojin_pipeline():
    add_p = dsl.ContainerOp(
        name="load iris data pipeline",
        image="xxxx/iris-preprocessing:0.6",
        arguments=[
            '--data_path', './iris.csv'
        ],
        file_outputs={'iris' : '/iris.csv'}
    )

    ml = dsl.ContainerOp(
        name="training pipeline",
        image="xxxx/iris-training:0.6",
        arguments=[
            '--data', add_p.outputs['iris']
        ]
    )

    ml.after(add_p)

if __name__ == "__main__":
    import kfp.compiler as compiler
    compiler.Compiler().compile(soojin_pipeline, __file__ + ".tar.gz")
핵심 부분이어서 모두 가져왔는데, 명쾌하게 잘 작성해 주셨다. 코드에서 언급한 대로 preprocessing container를 먼저 실행하고, 결과물은 iris.csv로 남겨둔다. 그 뒤 training container에서 add_p의 output인 iris.csv를 가져와 training한다.
커맨드라인에서 아래의 명령을 수행하면 위의 코드처럼 tar.gz로 끝나는 pipeline 파일이 만들어진다.
$ dsl-compile --py pipeline.py --output xxxx-iris-pipeline.tar.gz
4. 업로드 및 테스트
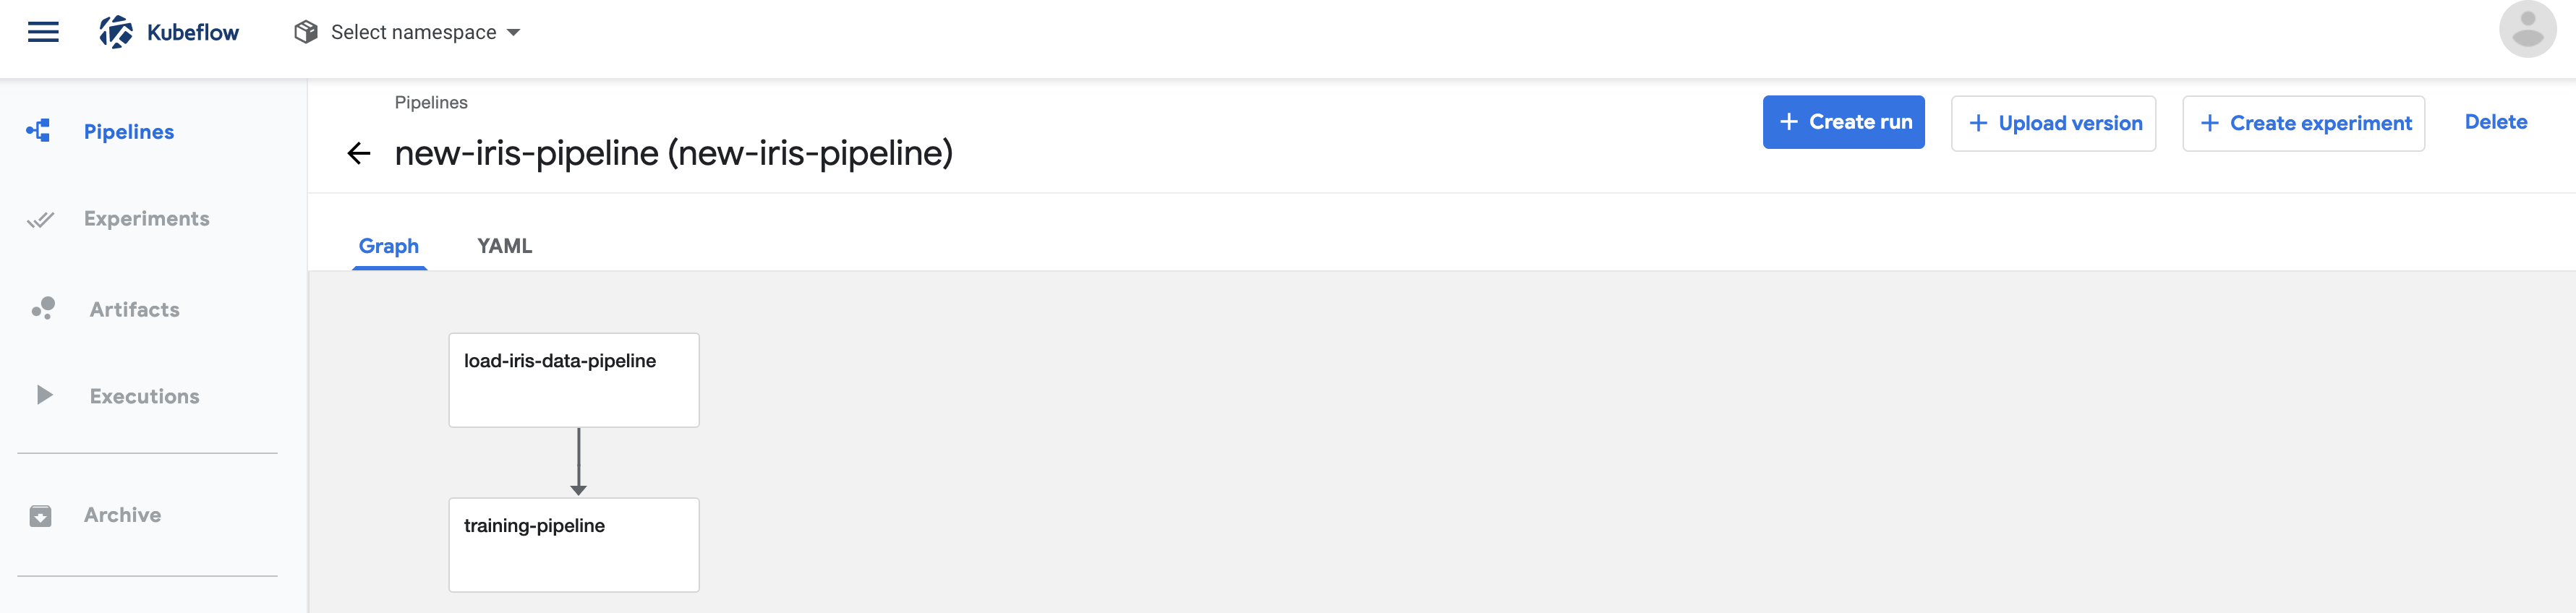
이제 코드 작업은 끝났다. Kubeflow Dashboard 메뉴에서 pipeline을 선택하고 '+upload pipeline' 버튼을 눌러 만들어진 tar.gz 파일을 선택만 하면 된다. 생성된 파이프라인에서 create run 혹은 test를 위해 create experiment를 선택하면 된다.
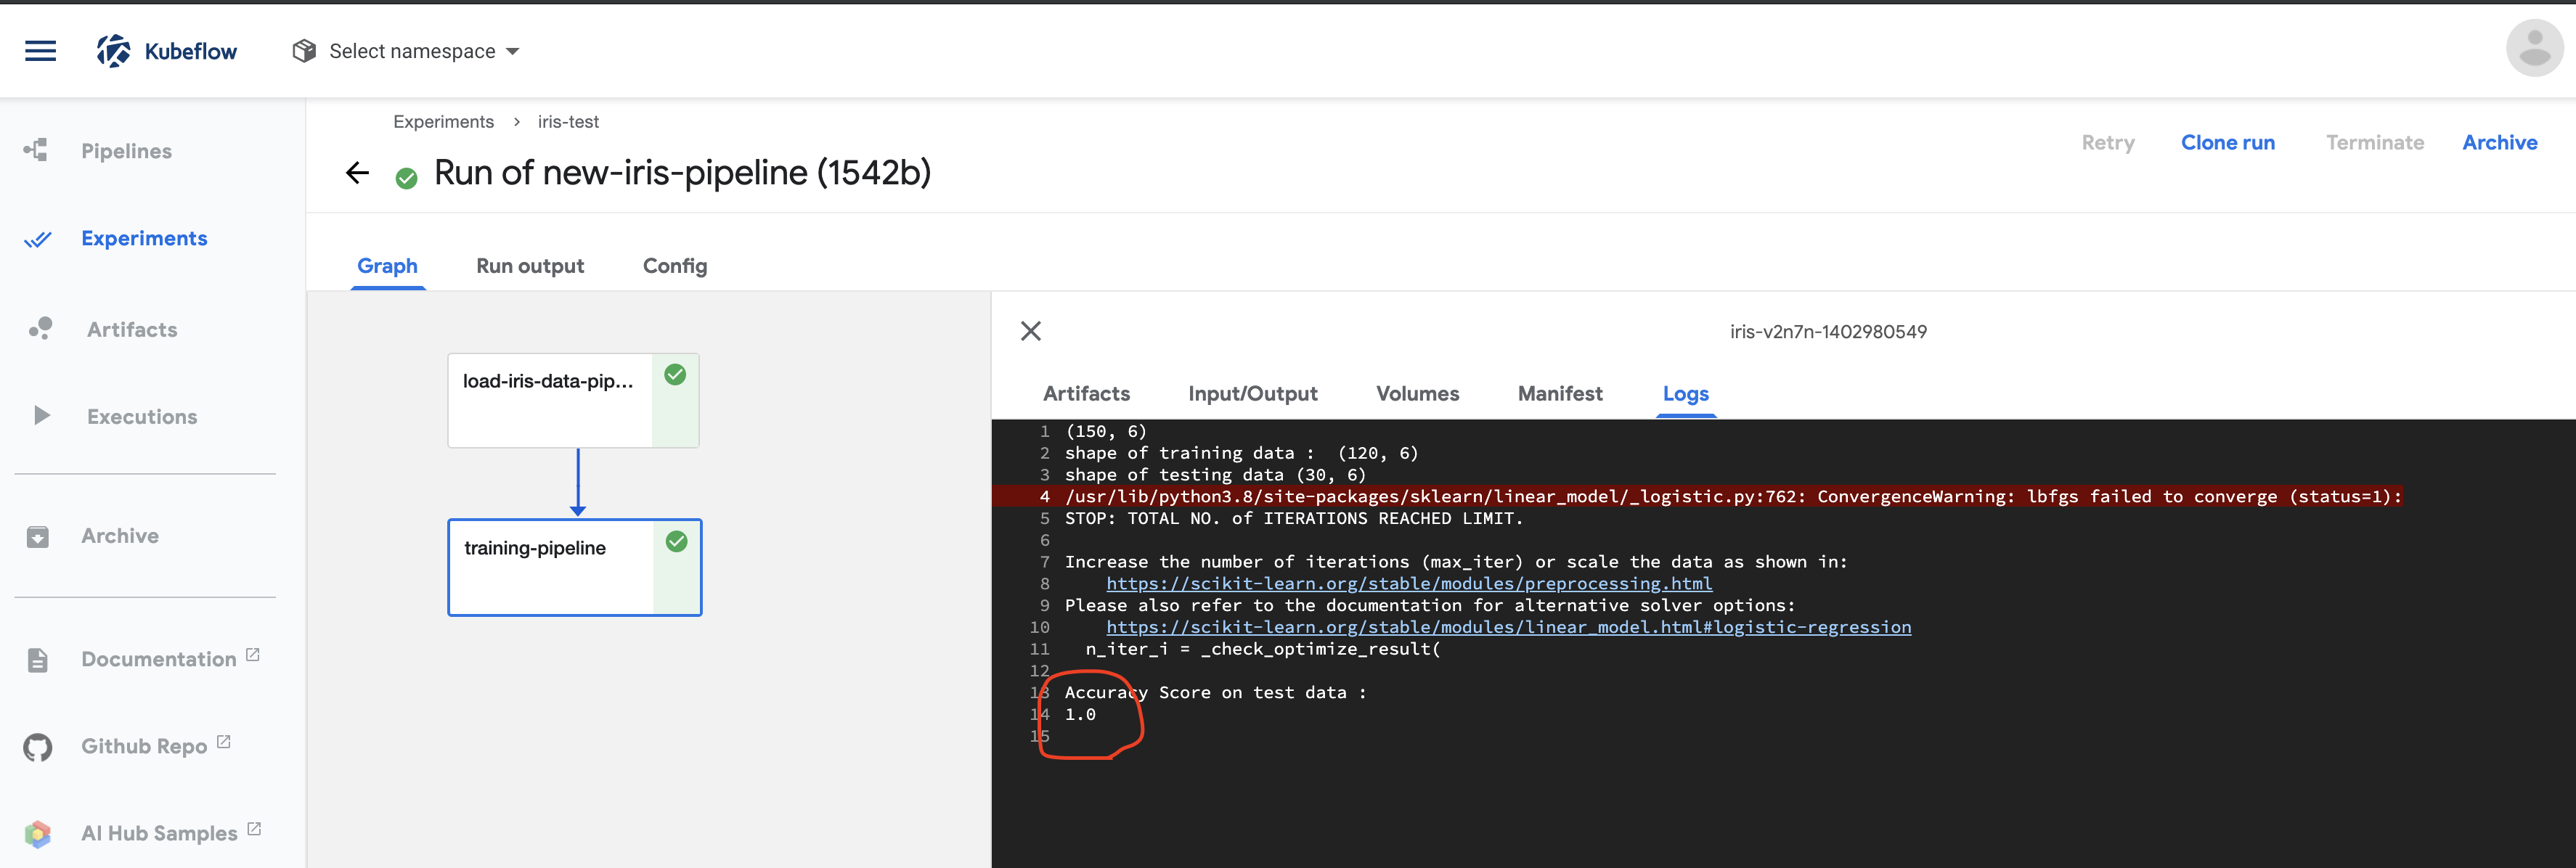
Run을 마치면, experiment에서 수행 결과를 확인할 수 있다. Warning이 있지만 무시하고, 하단에 Accuracy항목이 보인다.
간단한 예제지만, 이수진님 덕분에 Kubeflow의 동작을 조금이나마 이해할 수 있었다.
'AI 빅데이터 > Open Source Software' 카테고리의 다른 글
| [OSS] KNative로 컨테이너 Serverless로 서빙하기 (0) | 2020.07.14 |
|---|---|
| [OSS] Katib로 Hyper Parameter Tuning 하기 (0) | 2020.06.30 |
| [OSS] 맥에서 쿠버네티스 테스트하기 (0) | 2020.06.18 |
| [OSS] Jupyter Lab을 Git과 연동하기 (2) | 2020.06.11 |
| [가상화] WSL 2로 리눅스 쓰기 (0) | 2020.05.31 |


댓글